

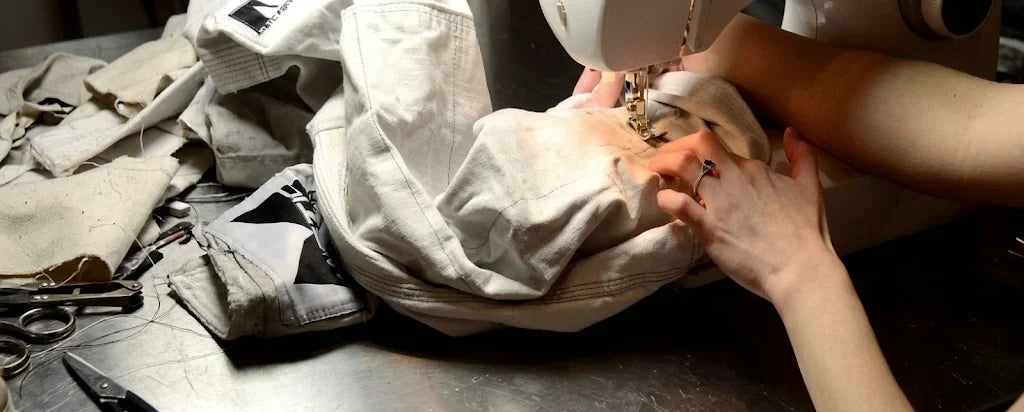
Quick answer: To repair a ripped BJJ gi, turn it inside out and re-sew split seams with strong thread, starting and finishing in the intact stitching. Patch torn fabric from the inside. If the fabric near the tear is thin or frays when you pull it, retire the gi or use it as a training gi.
Table of contents
You’re mid-roll, you pop a hip escape, and you hear that tiny rrrip. Now there’s a draft where there shouldn’t be one.
Before you bin the gi, know this: most rips are fixable, and some are a ten-minute job. This guide shows you how to repair a gi by tear location, how to tell whether the fabric can still hold a repair, and what to do when it can’t.

1. The quick version of "how to repair a gi"
- Wash and dry the gi so you can see the full damage.
- Turn it inside out and trim loose threads.
- Re-sew split seams with strong thread and a heavy-duty needle. Start and finish inside the intact stitching.
- Sew a second line beside the first.
- Patch torn fabric from the inside.
- If the fabric near the tear is thin or frays when pulled, stop repairing.
2. Don’t bin it yet: which rips are worth saving?
Not every rip is the same, and the right fix depends on which kind you have.
A split seam means the thread gave out but the fabric is fine. It’s the cheapest and most reliable repair.
A torn patch of fabric means the cloth itself failed. It’s fixable if the area around it is still strong.
A worn-through spot is fabric that has thinned from friction. It looks like a hole, but it’s really a warning that the surrounding fabric is close to going too.
Lapel or collar damage involves layered construction and needs more care.


3. The 30-second test that tells you if a repair will hold
Pinch the fabric about 2 cm from the damage and pull firmly in opposite directions.
If it holds, a repair is worth your time. If it frays, splits, or looks like gauze when you hold it to the light, the stitches will just pull through and the rip will move a few centimeters over.
3.1 What you’ll need
- Strong thread in a matching color. White thread for a white gi, black for black. Choose polyester or another heavy-duty thread, not a flimsy one.
- A sturdy needle. For a machine, use a denim or jeans needle (size 90/14 to 100/16).
- Pins or sewing clips, scissors and a seam ripper.
- Scrap cotton or twill for patches. An old pair of gi pants, or a cotton T-shirt, works.
- A thimble. Gi fabric is thick.
Treat iron-on mending patches as a backing layer at most. Adhesive on its own can peel, and it won’t take the pulling a gi gets.

3.2 Split seam: the easy win
- Turn the gi inside out.
- Pin the edges together exactly where they were originally joined.
- Begin about 2 cm before the split, inside the intact stitching, and backstitch to lock the thread.
- Sew along the original line with small, tight stitches. On a machine, use a straight stitch that’s slightly longer than the default.
- Continue about 2 cm past the end of the split and backstitch again.
- Sew a second line 3 to 5 mm away. Two lines share the load.
For hand sewing, use a backstitch. It overlaps itself, so it holds better than a running stitch.
3.3 Torn crotch: why your pants always go first
The crotch and inseam take the most stress. Squatting, hip escapes, open guard and takedown entries all pull on the same few centimeters of seam.
Fix it like a split seam, then reinforce it. Add two or three parallel lines of stitching, and consider sewing a small cotton patch across the inside of the junction.
If the rip is long, like the 7-inch inseam rip people ask about online, treat it the same way: sew the full length with overlap at both ends, then add the second line.
If you’ve repaired the same spot more than once, the fabric nearby is probably fatigued. A third repair is usually a sign to stop.

3.4 Knees and worn spots: patch from the inside
When the fabric itself has torn, you need a patch.
- Turn the gi inside out.
- Cut a patch at least 2.5 cm larger than the hole on every side, in a similar-weight cotton or cotton blend.
- Trim loose threads around the hole without cutting away good fabric.
- Fold the patch edges under about 1 cm, or finish them with a zigzag stitch.
- Pin the patch flat against the inside, with the hole centered.
- Sew around the edge twice, then add a few lines across the middle.
An inside patch won’t be visible on the mat, and it supports a spot that was about to give.


3.5 Lapels: handle with care
The lapel is thick and layered. If only the stitching has loosened, you can usually re-sew it along the original stitch lines with a heavy needle and a thimble.
If the lapel has torn through, the inside filling has shifted, or the collar is separating from the jacket, take it to a tailor. A rough repair here can leave the lapel lumpy.
4. Small rips, quick fixes
- Belt loop: Re-attach it with a small square of stitching and a cross through the middle. Do it twice.
- Side vents: These tend to tear at the top of the slit. Sew a short bar of tight stitches across that point to stop the tear from spreading.
- Sleeve cuffs: Fold a frayed edge under and sew along it.
- Drawstring: If the cord has pulled out, pin a safety pin to one end and feed it back through the waistband channel.
5. Is a tailor worth it?
For a long rip, lapel damage or a repair you’re not confident about, often yes. People in the BJJ community report that a local alterations shop can give a gi a lot more life for a modest cost. Prices vary a lot by shop, so ask for a quote before you commit.
DIY is a good fit for split seams, small tears and loose belt loops. A tailor is the better call for structural damage.
6. Repair, retire or replace?
Repair when the damage is in one spot, the fabric nearby is strong, and the repair costs less than a new gi.
There’s also a middle option: retire it to training duty. A patched gi that you’d rather not wear to a tournament can still serve for drilling and open mats.
Replace when the fabric tears easily, the same spot keeps failing, or the lapel or collar structure is damaged. Our guide on how long BJJ gis last covers more signs that a gi is finished, and our pearl weave vs ripstop breakdown explains how weave affects wear.
When it’s time for a new one, the BJJ gis collection has options for men, women and kids. The Men’s Core White BJJ Gi is listed as IBJJF approved.


7. Warranty reality check
Elite Sports products carry a 1-year warranty. If there’s a problem with a product, you can email support@elitesports.com to arrange a replacement. The warranty doesn’t cover regular wear and tear.
So if a seam fails very early, or you spot a stitching fault in a new gi, contact support before you repair it. If the rip comes from months of normal training, a repair is how you stretch its life.
8. Will a repaired gi pass inspection?
Competition organizers expect a clean gi in good condition, and a torn one can be rejected. A neat repair on the inside is far less likely to cause trouble than visible damage.
Be careful with patches on the outside of the gi. At IBJJF events, patches must be cotton, properly seamed and placed in authorized areas, or inspectors will remove them. Our guide to IBJJF legal gis has the details. If you’re competing soon, mend from the inside and check the rulebook for your event.
9. Make the next rip less likely
- Fix small problems early. A loose thread or opening seam is a five-minute job today.
- Reinforce weak spots. Add a second line of stitching along the inseam and knee seams before they fail.
- Rotate your gis. Wearing two or three in turn means less wear on each.
For more, see our guides on caring for your BJJ gi and making BJJ gis last longer.
10. FAQs
Can you repair a ripped BJJ gi?
Often, yes. Split seams, small tears and loose belt loops are straightforward. Lapel damage and large worn areas are harder and may need a tailor or a replacement.
What thread should I use?
Use strong thread, such as polyester or another heavy-duty thread, in a matching color.
Can I fix a gi without a sewing machine?
Yes. A sturdy needle, a thimble and a backstitch will do for most repairs.
How do I fix a ripped crotch in gi pants?
Turn the pants inside out, sew along the original seam line with overlap at both ends, then add a second line. A small inside patch adds support.
Can I use iron-on patches?
They’re better as a backing layer than as the main fix, because the adhesive can peel.
Should I take my gi to a tailor?
For long rips, lapel damage or any repair you’re unsure about, a tailor is a good option. Ask for a quote first.
Does the warranty cover a ripped gi?
Elite Sports covers product problems for one year but not regular wear and tear. Contact support@elitesports.com if you think a rip is a product defect.
Is a repaired gi legal for competition?
That depends on the event and the repair. Torn gis can be rejected, and IBJJF patches must be sewn and placed in authorized areas.
Can I keep a patched gi for training?
Yes. Many grapplers keep patched gis for training and open mats.
11. The bottom line
A rip isn’t always the end of a gi. Fix small problems early, sew two lines instead of one, and patch from the inside. If the fabric is worn thin, put the money toward a new gi and keep the old one for drilling.



Leave a comment
This site is protected by hCaptcha and the hCaptcha Privacy Policy and Terms of Service apply.