Table of content
Bicep Taping is an economical option to treat and prevent various bicep injuries. People who engage in repetitive arm motions frequently feel pain in the upper arm and near the shoulder region. If such pain is ignored, it can lead to more serious injuries like bicep tendonitis.
- There are many taping techniques available that utilize Kinesio
- Tape to deal with such pain and injuries.
- Here you will learn how taping helps with pain in your biceps, how you can tape your biceps, and K-Tape application techniques to deal with bicep tendonitis in particular.
1. What is Taping?
Taping is a therapeutic tool that is used for the prevention and treatment of sports injuries. Since taping effectively supports weaker body muscles, it has gained popularity not only in dealing with sporting injuries but also with other conditions.
2. Benefits of Taping
When used correctly, taping can provide a number of benefits. It can:
- Increase muscle support and improve body posture
- Prevent injuries
- Increase the speed of healing
- Provide support to the joint
- Enhance proprioception (a sense of being aware of one's surroundings)
- Keep the shoulder joint aligned
3. How Taping Helps Biceps?
- Taping biceps can provide support for the long and short head of biceps tendons.
- Tendons connect the bicep muscles to the shoulder bone at the top and the radius at the bottom of your arm. Individuals who extensively use their upper arm for repeated motions are constantly at risk of tendon injury.
- Tendon injuries can be managed by using tape that allow you to remain active while reducing pain. The tape's compression helps to minimize inflammation in the injury. As a result, pain is reduced and the necessary to heal is shortened.

4. Types of Taping
There are two types of therapy tapes, athletic and Kinesio, which are comparable but extremely distinct. Each one has a role to play in injury management, but they cannot be used interchangeably.
4.1 Athletic Tape:
What is Athletic Tape?
Athletic tape is a stiffer tape that is readily available and affordable. Athletic taping is the application of tape directly to the skin to keep bones and muscles in a stable position during athletic exercise.
How is it used?
Athletic tape is used to restrict joint movement but is less restrictive than wearing a brace. It physically holds muscles or bones in place.
The following are some points to keep in mind when using athletic tape:
- Restrict your range of motion
- Compress and support your joints
- Do not stretch as you move
- Cheaper than K-Tape
4.2 Kinesio Tape
What is Kinesio Tape?

Kinesio Tape, also known as K-Tape, is a more breathable, light-weight tape with adhesive that pulls on the skin gently.
It is an elastic cotton strip with an acrylic adhesive that relieves pain and impairment caused by athletic injuries and other physical problems.
How is it used?
It can be applied to muscles, joints, and ligaments to support and reduce discomfort. It helps to minimize swelling, improve movement, and speed up healing. Many common muscle and joint ailments, such as muscle strains, sprains, and tendonitis, can be prevented or treated with KT Tape.
With the body's natural ability to repair itself, KT tape can provide therapeutic treatment to a wide range of health issues.
The following are some things to keep in mind when using K-tape:
- K-Tape supports the shoulder joint and allows a wide range of motion
- It enhances proprioception and can be worn for several days without needing to be replaced
- The fabric stretches as you move and the adhesive pulls slightly on your skin to improve lymphatic circulation
5. Why is Kinesio Tape best for Biceps?
K-tape has been utilized successfully in physiotherapy and physical therapy sessions as a treatment method for biceps tendonitis. Unlike the stiff athletic tape, K-Tape gently lifts the skin from the tissues below due to its elasticity.
This mild lifting of the skin makes room for better blood and lymphatic movement, which helps to relieve pressure and minimize swelling. When blood flow is restored, oxygen and nutrients can better reach damaged tissues which aid in a speedy recovery.
Moreover, Kinesio tape is available in many colors which makes it more appealing. Due to these multiple benefits, it is ideal to use for biceps pain.

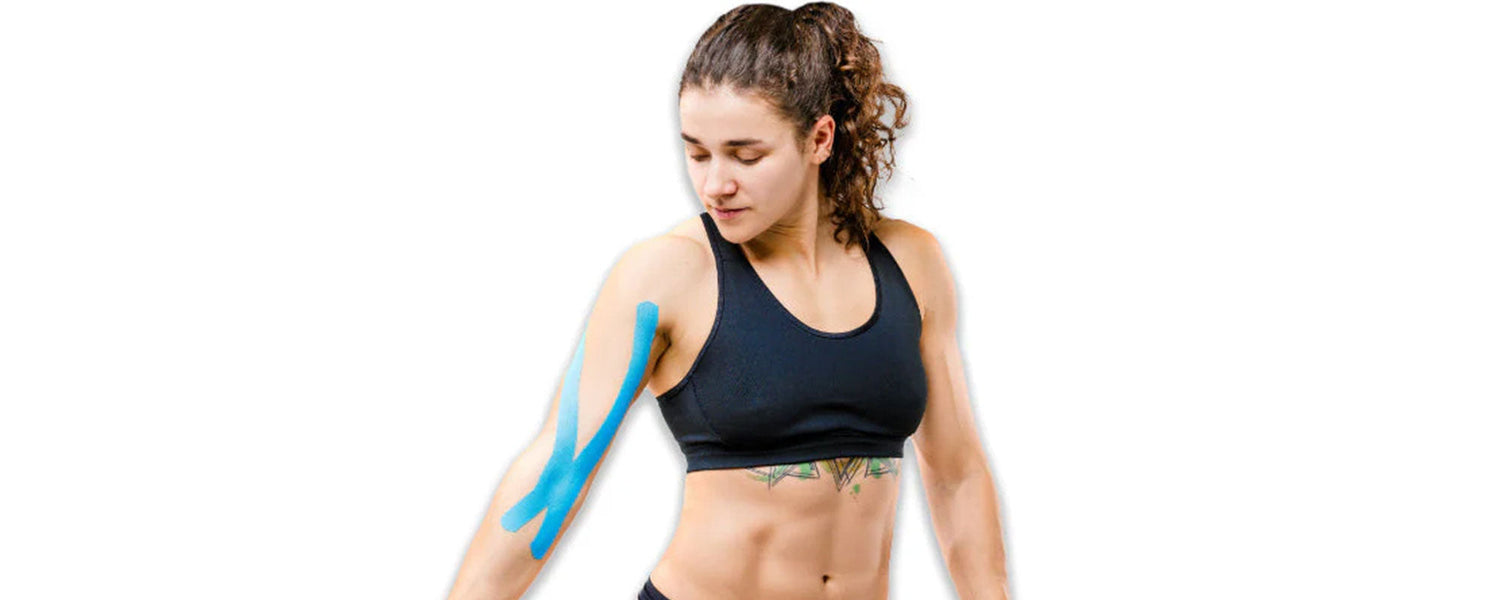
6. Kinesio Taping for Biceps Pain
6.1 How to Tape your Biceps with K-tape?
All you need is a pair of scissors, a K-tape, two minutes, and a little patience and practice.
Before applying K-tape, you must cut the tape into strips. There are three main strip shapes used for biceps: I, Y, and Lymphatic Fan.
How to cut strips of K-Tape?
I-Strip:
- To cut an I-strip, measure the tape’s length based on the length of your bicep and cut it.
- Then fold the tape in half and make both ends rounded.
Y-Strip:
- To make a Y-strip, vertically cut an I-strip in half and leave a 10 cm tab at the end.
- Make both corners on the ends rounded.
Lymphatic Fan:
- To cut a lymphatic fan, take a Y-strip and cut both of its tails in half vertically so that you have four tails.
- Make all the corners at the ends rounded.
6.2 Kinesio Taping Techniques for Biceps
I-Shape Biceps Taping
- First, extend your arm at your side. Take an I-shaped strip of K-tape and anchor one end above and inside your elbow without stretching it.
- Apply the tape alongside your biceps to the front side of your shoulder with a 25% stretch. Place the end at the shoulder without stretching the strip.
- Rub the whole tape strip again to activate the adhesive.
T-Shape Biceps Taping
- Start by placing the end of a piece of Kinesiology tape (I-strip) over the top of the shoulder. Pull it down along the inside of the biceps muscle at a 50% stretch.
- Place a second piece (a smaller I-strip) of K-tape perpendicular to the first piece of tape along the front of the shoulder with a 50% stretch. Wrap the tape across the shoulder's backside.
Y-Shape Biceps Taping:
- Begin by cutting a Y-strip out of Kinesiology tape. Start about two inches below the elbow and place the tape's base on the inside of the arm.
- One Y-stripshould run along the outside of the upper arm, while the other should run along the inside of the upper arm.
6.3 How to Apply K-Tape for Biceps Tendonitis?
One Strip K-Taping for Biceps Tendonitis
- Take a Y-strip of K-tape and place its base two inches below the radial head on the front part of your arm.
- Make sure to spread the strip without any tension along its length.
- Then place the lateral tail of the Y-strip to the outer part of the biceps along the outside edge of the long head.
- Place the medial tail along the short head of the biceps tendon. Once appplied , put both the ends down with no stress and rub the strip to activate the adhesive.
Two Strip K-Taping for Biceps Tendonitis.
- Take a two-inch wide K-tape with a slit down the center. Anchor one end of the tape directly above the elbow without any stress.
- Then spread the tape across the biceps’ tendons and fix the other end to the shoulder without strain.
- To minimize irritation and allow stabilization, apply a second tape from one end of the shoulder to the other.
Three Strip K-Taping for Biceps Tendonitis
- Take a long Y-strip of K-tape measured from the shoulder to the inside of the elbow. Cut two inches then apply the strip in the middle of the upper part, leaving a two-inch base in middle, and cut the remaining lower part.
- Remove the back paper from the base and apply it to the inside of the elbow while pulling fully. Run two of the shorter tails down towards the left and right to the radius bone without pulling.
- Then remove the back paper of the upper long tails and place one strip around the biceps up against the shoulders while pulling fully. Attach its end without pulling. Then pull the second tail with tension below the bicep up to the shoulder and rub its end without tension.
- Take two more Y-strips that are six inches in length. Cut both of them in the middle by leaving a two-inch base.
- Take the second strip and place it below the intersection of the first tape’s upper strips and tape it up and down with a slight pull at 45-degree angle.
- Tape the third strip just like the second one but positioned a little bit higher and applying both ends without tension.
6.4 How long should you wear K-Tape?
You can wear Kinesio tape for about four to five days after application. Placing it on your skin past the required time can result in allergic reactions.
6.5 How to Remove K-Tape?
- The best way to remove K-tape is to peel the skin away from the tape instead of peeling the tape away from the skin.
- Make sure to remove the tape in the same direction as the hair growth underneath. Never rip it off like plaster.
- Begin carefully, gradually folding the corners of the edges back, making sure to place the removed tape on the back of the applied tape rather than dragging the tape above and away from your arm.
- While peeling off the tape, use your other hand to hold your skin down and gently pull it in the opposite direction of the tape. This allows the tape and the skin to separate more effectively while remaining pain-free.
- If the tape has been put to a hairy area of your body, it is beneficial to press down on the tape as you peel it off to avoid extra pain. It's best to shave the area before placing the tape, but since this isn't always possible, you may need to take this precaution.
6.6 Tips and Precautions for K-taping
- Before taping, thoroughly remove dirt, moisture, oils, and lotions from the skin.
- Stick tape at least one hour before any activity.
- Make sure not to wear the tape for more than a week .
- After application, rub the tape several times to activate the adhesive.
- Remove the backing paper before applying the tape and always apply the tape without stretching the ends.
Photo Credit: @inhomephysicaltherapy


Leave a comment
This site is protected by hCaptcha and the hCaptcha Privacy Policy and Terms of Service apply.